An Unbiased View of wiring a ceiling light
Wiki Article
This article in the next paragraphs about wiring a ceiling light is rather intriguing. Don't miss out on it.
You'll usually see us refer to 2-wire as well as 3-wire illumination systems. This is a vital factor as several items, such as relays, can not function if mounted right into a 2-wire system.
This application note describes the distinction between 2-wire and 3-wire lights systems and also assists you comprehend which variation you have in your installation.
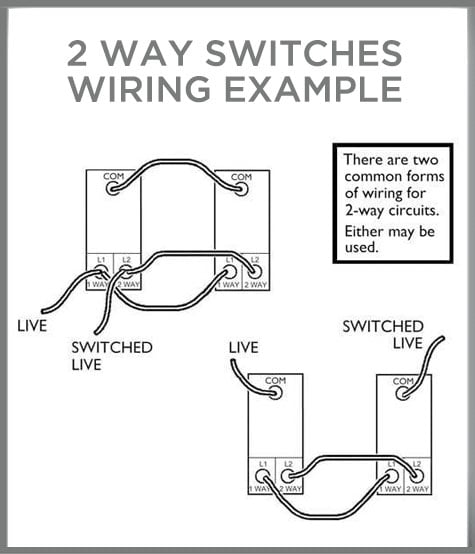
To start with, what do we indicate by 2-wire as well as 3-wire systems. The basic explanation is that a 2-wire system does not consist of a Neutral cord at the light button, the 3-wire system does consist of the Neutral at the button.
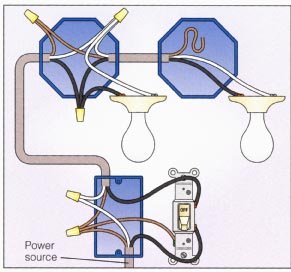
2-wire Illumination Solutions
This is the most typical lights system in Europe, almost all residences use this system, particularly in the UK and Nordic areas.
The term is slightly complicated as the system will actually consist of 3 wires. However, the 3rd cord, which typically has a green/yellow sleeve is the Planet cord. The Earth is a really fundamental part of the electric system and all switches, devices and lights need to be appropriately earthed. However, for the purpose of simplicity we disregard the Planet cable when discussing wiring as it plays no active function in the everyday workings of your light circuits.
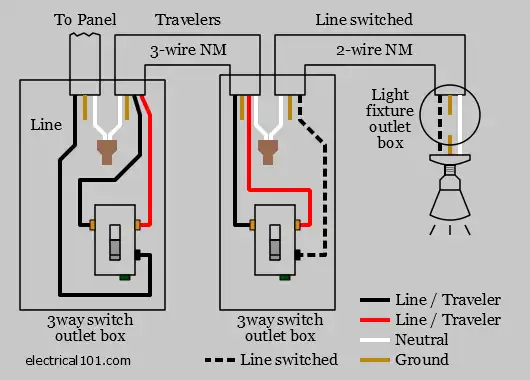
3-wire Lights Solutions
The 3-wire system is less common than the 2-wire system, it includes a Neutral at the button along with the Live as well as Switched Live wires.
An instance of a 3-wire illumination circuit is shown in Number 2. One '2-Core + Earth' cable takes Live and also Neutral to the button back box, a 2nd cable takes the Neutral and also Switched Live to the light.
Keep in mind - the Neutral is not linked to the actual button, both Neutrals are linked together making use of a port block.
Exactly how do I know which system I have?
As the 2-wire system is one of the most typical, it's possibly best to begin with the assumption that you have a 2-wire system, particularly if you're in the UK or if your home is more than 3-5 years old.
You can examine the complying with points:
• Are all the wires attached to the switch?
• Do all the cables have a brownish sleeve on them?
• If the response is YES to either of these points, you have a 2-wire system
• Do you have two blue, black or grey cords mosting likely to a connector block? If so you MAY have a 3-wire system, but you should validate this with a voltage meter or seek advice from a certified electrician.
A Word of Caution
Shut down the breaker regulating the light and follower circuit. This is the single essential part of any type of residence wiring procedure. Even after turning off the breaker, it's still a good idea to use a voltage tester to check the cord links prior to you deal with them.
You'll Need to Make Pigtails
In electrical work, a pigtail is a collection of cords interlaced along with a brief length of wire. The pigtail allows you to link all the cords to a solitary terminal. The key to making a reliable one is to twist the wires together clockwise-- not counterclockwise-- prior to screwing on the cap. This way, the clockwise threads of the cap make the connection tighter when you screw it on.
Transforming From 2 Buttons in the Same Box to One Switch
Disconnect the two black wires from both buttons. If you do not know which one materials power to each switch, turn the power back on and also examine the cords by attaching each to ground with your voltage tester. The real-time circuit cords Our site will certainly offer you an analysis as well as the others won't. Turn the breaker back off when you know which is which.
Make a pigtail with both live wires and also a brief size of black wire of the exact same gauge. Connect the brief cord to the leading terminal of the switch you want to utilize. Do the same with both various other cords, as well as connect them to the bottom terminal of the switch.
Loosen the cap from the two white cords offering the switch you're no longer making use of, include a short length of white cable of the same scale and also screw the cap back on to make a pigtail. You may need a bigger cap than the one that was on there. Entwine the various other end of the brief wire to both white wires offering the brand-new switch. If you want, you can additionally just splice all four white cables together under the very same cap, however you may locate that tough to do with four cords.
Eliminate the ground from the out-of-service button as well as the one from the button you're utilizing. Connect them by turning them together or making use of a crimp ring, after that connect them to the green ground terminal on the button you're using.
Attaching a Light and Follower to a New Switch
Locate the button cable, which must be sticking via the top or side of the box serving the fan or light. Using wire strippers, strip an inch of insulation from the end of the black and white cables. Entwine the black cord from the fan along with the black cable from the light and also the black wire from the switch, and also cap them. Link the white cords with each other similarly, then repeat with the ground cords. When you splice ground cables, you do not have to top them, however it's still an excellent idea to do so since the cap helps maintain them with each other. Mount the fan and also light and transfer to the button box.
Connect the black wire from the follower to the bottom terminal of the switch and the live circuit wire to the top terminal. Splice the white wires together and cover them. Spin the ground cords with each other and also connect them to the green ground screw on the button.
I discovered that write up about wiring a pendant light while doing a lookup on the web. In case you enjoyed our blog posting kindly consider to pass it around. We love reading our article about wiring a ceiling light with 2 wire.
If the two the ceiling admirer and admirer light are controlled with a person wall swap, there's nothing you are able to do about decreasing the light’s brightness.
Make this happen by aligning the canopy with the crossbar. Go away a certain amount of screw thread out so it may possibly extend in the Cover. Using a lock nut, fasten the duration in place.
Make sure that you feed the wires coming from your ceiling in the center hole during the bracket. Use the screwdriver to make certain that the screws are limited so that the fan isn't going to wobble when it receives turned on at the end of the day.
The following move and nearly all your time spent on this task might be to research the wires in concern. Unfastened wires will with any luck , be obvious but some probing could be required to check how loose These are.
Charges for local content / gear shipping to and repair service provider transportation to and from the career website.
Then location the tip within your non-Make contact with voltage tester on any uncovered wire tips coming out of your ceiling to substantiate that no current is flowing throughout the wires.
You'll then have to Slash from the ceiling with an electric noticed in accordance with the trace that you've got just created.
Try getting rid of it to find out if it solves your difficulty. If not, you may normally place it back again in. To remove the limiter:
Even in situations where by a ceiling fan doesn't arrive with lights, it is often intended in such a way that a light kit may be attached to it.
Then, obtain the black wire coming within the admirer hooked up to your black wire coming through the ceiling to deal with the admirer relationship.
Fundamentally, you have to use equally solitary very hot or black wires for powering both equally switches. It’s possible by just applying longer duration wires for jumping to the two switches.
One particular need to be silver, that is neutral, and the opposite could well be copper, that is sizzling. For that reason, you would probably connect the copper wire into the black wire during the ceiling and the silver wire for the white one particular. Not surprisingly, normally take a look at as explained previously mentioned to ensure you have the correct connection.
Sign up to hitch this Neighborhood Anybody can check with an issue Anybody can remedy The very best answers are voted up and increase to the very best
You'll need to switch the bit of broken wire. You could speak to an individual at your neighborhood components shop concerning what wire is finest to be used inside a ceiling admirer light fixture and afterwards buy a length of this.